There are no products listed under this category.
Shop by Category
Shop by Brand
Shop by Brand
How to install a package of bees in a beehive
How to Install a Package of Bees
Into a Beehive
Ready? Click to buy your bees!
I have this package of bees - Now what?
The first thing to do is to watch this video and then read through the description below to ensure you are ready when your bees arrive. You can also download a pdf copy of How to Install a Package of Bees to take with you to the bee yard.
In this YouTube video, Christy Hemenway walks you through the process step by step. By the way, no bees were harmed in the making of this video. In fact, there are no bees in this video so that you can see the details!
The Package
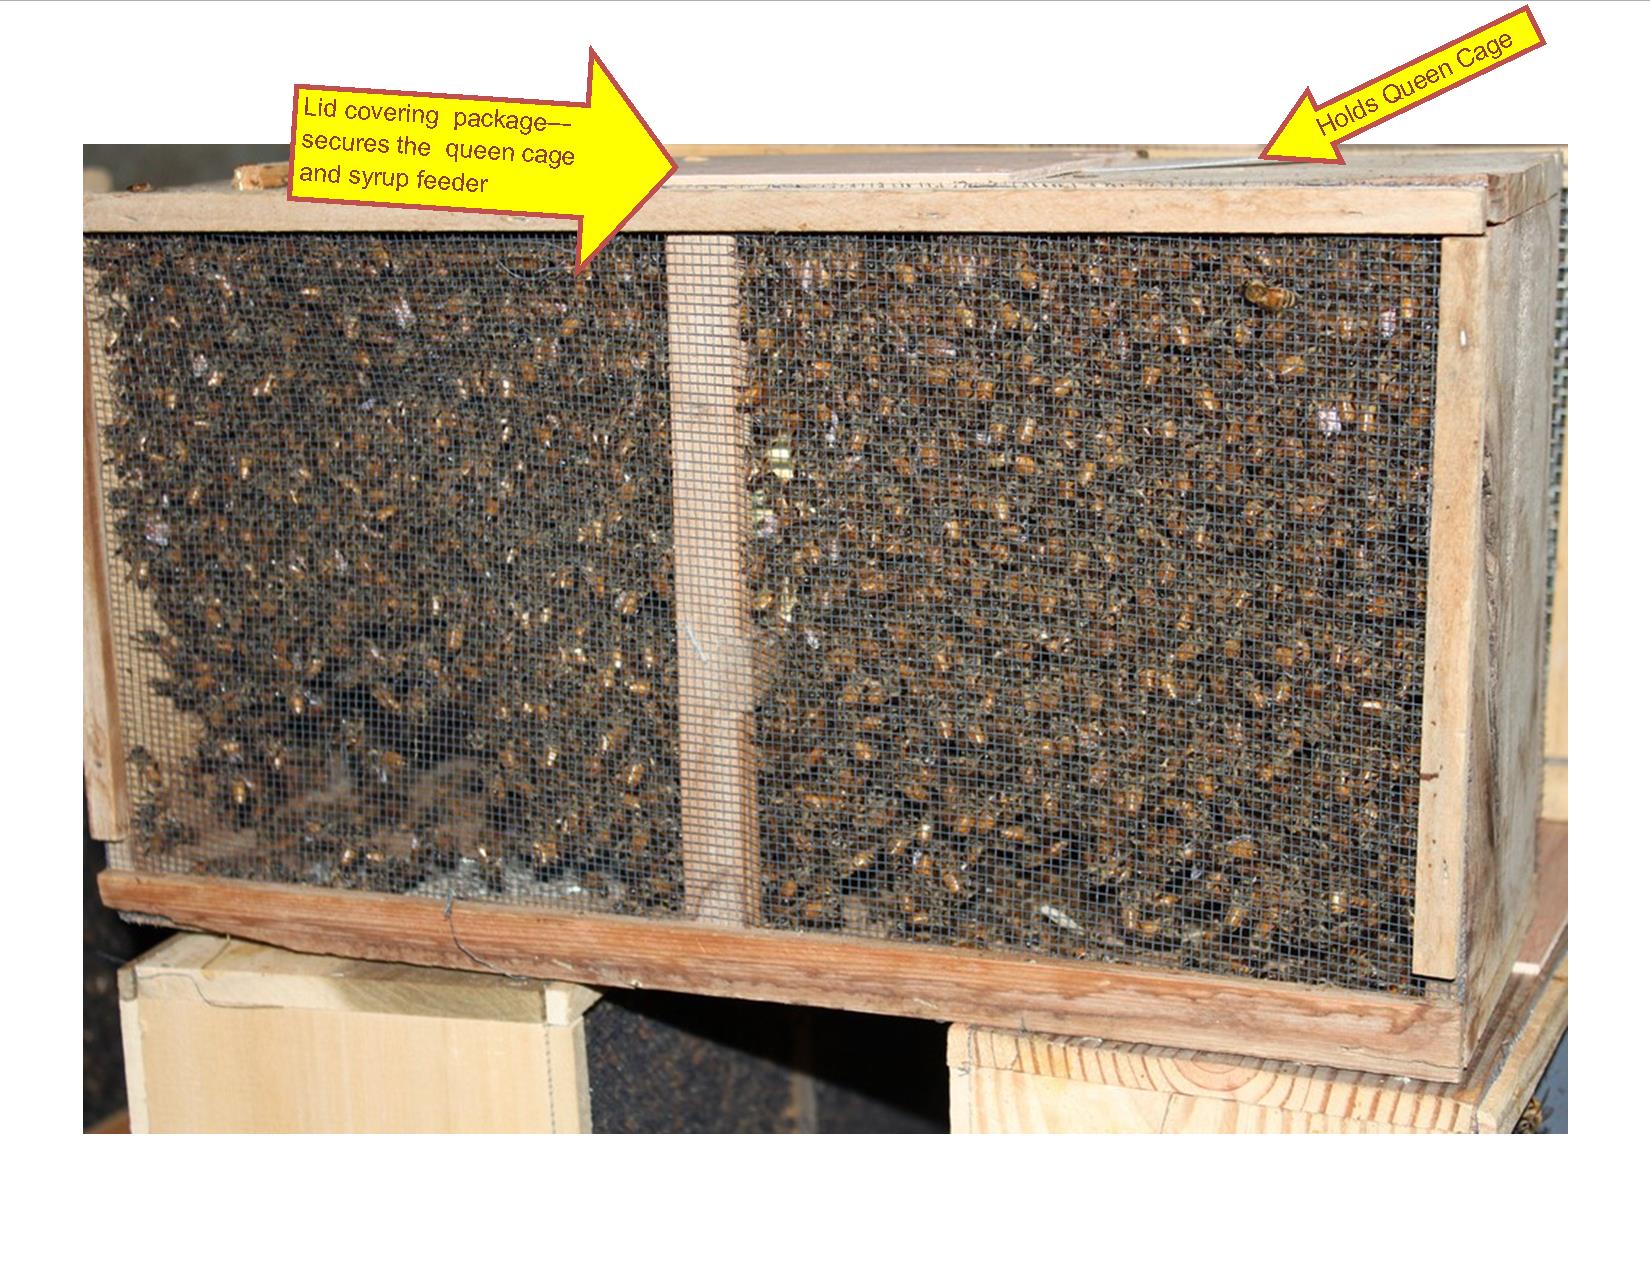
Let's first take a look at the package. This will help us know what to expect as we go through the process. If you look at this picture, you will see the strap that holds the queen cage and you will also see the lid that covers the package; securing the unseen queen cage and the can of sugar syrup.
Ready? Click to buy your bees!
The Tools
- a screwdriver or putty knife for prying up the lid of the package.
- a push pin is necessary for attaching the queen cage to a top bar (take several in case you drop or bend one). In a Langstroth hive, the queen cage can be gripped between two frames.
- a sheetrock screw is useful for removing the cork from the exit hole in the queen cage. Gently press the tip into the cork and turn, being careful not to push so hard that it forces the cork into the cage, but only catches the cork, like a tiny corkscrew.
- a pair of pliers, specifically vise-grip pliers, is useful for grabbing the feed can by the rim, and removing it from the package.
- Syrup and / or fondant feeder depending on the weather. A new package must be fed because they have no stores to draw from and must build their comb.
The Process
When you are preparing to hive your new package of bees you want to be sure that you are wearing protective clothing, including a veil and gloves. You will want a good clear area near the beehive to work. Also ensure that you have all of your tools so you can complete the installation without having to interrupt the process. You will want to work confidently and with purpose but there is no need to hurry or rush.
The Bee Bowl
Before you open the package of bees you will want to prepare the hive for their arrival. That means that you want to create an empty space in the hive into which you will pour bees. In a Gold Star Top Bar beehive which has 30 bars and two follower boards, we recommend starting with the two follower boards 10 bars apart in the center of the hive. Remove all of the bars in this center section. Make sure you place a sugar feeder in the same end of the beehive as the follower board with the uncorked hole (drive-thru window). In a Langstroth beehive you will want to remove 4 or 5 frames from the center of the super to create the bee bowl.
The Queen and the Can
You can't see it in the above picture but in the center of the package, behind all those bees, there is a can filled with sugar syrup and there is a small cage that houses the queen and some attendants. The next steps in the process describe separating the queen cage from the rest of the package.
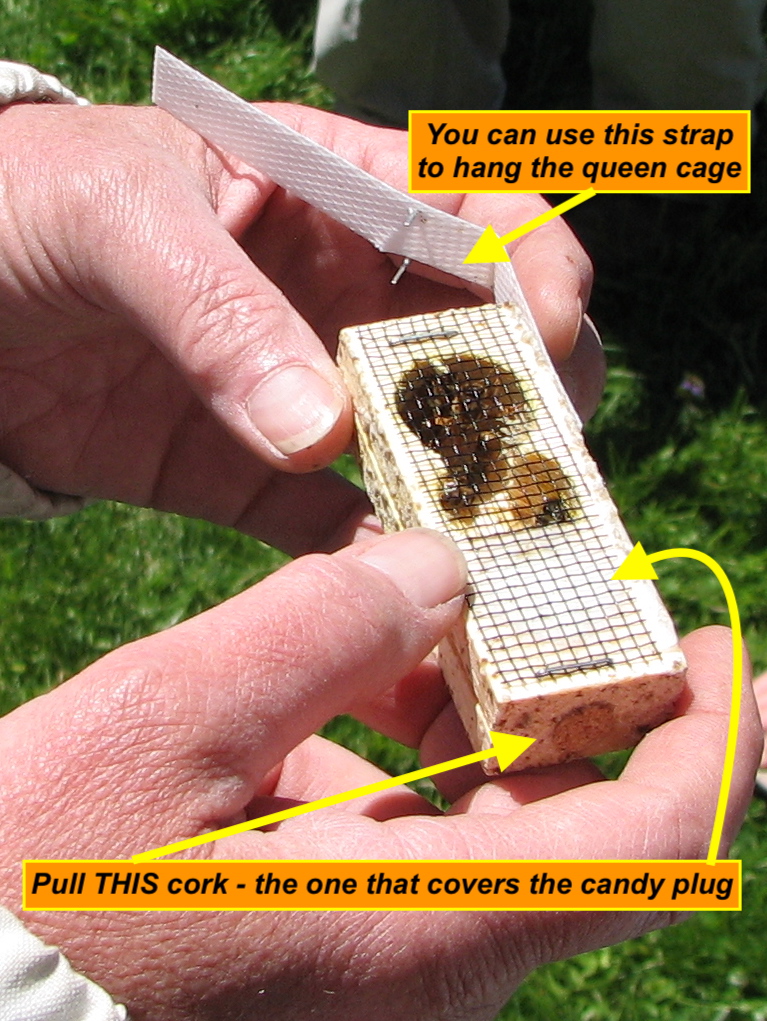
Here is a closeup of the queen cage, showing the candy plug and which cork to pull. 
Please note that not every bee package is exactly the same. Sometimes the queen cages are different, sometimes the hangers are different, sometimes you have to remove the syrup can first to get the queen cage out, sometimes the queen cage can be removed first. Traditionally the package itself is made of wood, but there are plastic packages too. Don't let the differences throw you - your goal is the same in every instance - retrieve and hang the queen, and then thump and dump the bees.
We are now to the point where we are working directly with the package of bees. Ready?
- Use a flat head screwdriver or putty knife to remove the staples holding the cover in place.
- Lift the cover to determine whether you have a package where you can slide the queen cage out; or if you must remove the syrup can first.
- Lay the cover back on the package and hold it in place while you lift the box and thump it solidly on the ground. This causes the bees clinging to the syrup can to fall to the bottom of the cage
- Moving assuredly, remove the cover and press down on one side of the can with the syrup. This should cause the other side of the can to lift above the package rim. Use pliers or vice grips to grip the rim of the can and gently remove it from the package.
- Remove the staple holding the queen cage strap. Remove the queen cage and its strap and place the cover back on top of the package.
- If you are hiving into a Langstroth beehive you should put the queen cage in a safe place; setting the queen cage on top of the remaining frames in the box or, if it is cold, you can put the queen cage in your pocket to keep her warm. If you are hiving into a top bar beehive you will now take the queen cage, remove the cork from the end with the sugar plug and then attach the queen cage to a top bar, using a push pin.
- Place that top bar next to the follower board nearest the feeder, taking care that the queen hangs directly below the bar and doesn't extend under the adjacent top bar.
Bonking the bees - aka Thump and Dump
We are getting close to the end and now it is time to put the bees in the beehive. To do this we are going to take the package of bees with the lid held over the hole. Next we are going to raise the package about 12 to 18 inches off the ground and we are going to bonk or thump the package sharply to the ground so that all the bees fall in a pile in the corner. Now pull the lid off the package and start to pour the bees into the box. You won't get them all and that is okay. Leave the mostly empty package near beehive and the stragglers will make their way into the hive.
If you are installing into a top bar beehive you can now replace the rest of the top bars, put the lid on the hive and you are done. If you are hiving into a Langstroth beehive you need to put the frames carefully back into the hive, squishing as few bees as possible. You also need to remove the cork from the end of the queen cage with the sugar plug and then wedge the cage between two of the frames, near the top of the frames. Now you can place a syrup feeder at the entrance or above the inner cover, close up the hive and you are done.
If this is your first hive—Congratulations! You are now a beekeeper!
One Final Note:
No matter the type of beehive you use, it is important to return to the hive within three to five days to verify that the bees have released the queen from her cage. If they have, great! Remove the queen cage from the hive. If they have not, you can release her manually by pulling back the screen and gently dumping her into the hive. Be sure to hold her down close to the hive so that she doesn't fly off. :-)

Wouldn't it be helpful to have this information with you when you go out to actually put your bees in the hive? You can download a .pdf copy of How to Install a Package of Bees and have it with you as you work.
Ready? Click to buy your bees!
